The first time I made these swirled tiramisu brownies, I was scrambling to finish a birthday cake for my niece while the house was filled with the hum of a summer barbecue. The moment the batter hit the pan, a deep, earthy chocolate scent rose like a warm blanket, and then—just as the espresso hit the mixture—a bright, coffee‑kissed aroma burst through, instantly transporting me back to the bustling cafés of Rome. I remember standing there, watching the glossy swirl form, feeling a thrill that was part anticipation and part pure, unapologetic joy. It was as if two beloved desserts had decided to dance together, and I was the lucky host of their first waltz.
What makes this recipe so unforgettable isn’t just the combination of chocolate and coffee, but the way each component is treated with reverence. The butter is melted just enough to stay liquid, the eggs are whisked until they turn a pale, airy ribbon, and the mascarpone is folded in with a gentle hand so it never loses its creamy silkiness. When the espresso meets the cocoa, it creates a flavor depth that feels both familiar and exotic, like an old friend who’s just learned a new secret. And the final dusting of cocoa powder? It’s the visual punctuation that tells you, “This is dessert, and it’s meant to be savored slowly.”
But wait—there’s a hidden trick that takes these brownies from good to legendary, and I’m only going to reveal it after you’ve read about the ingredients and the step‑by‑step process. Have you ever wondered why some brownies turn out dense and dry while others stay fudgy and moist? The answer lies in the balance of moisture and the timing of each fold, and I’ll walk you through every nuance so you never have to guess again. Trust me, once you master this, you’ll be the go‑to host for every coffee‑loving crowd.
Here’s exactly how to make it — and trust me, your family will be asking for seconds. Imagine cutting into a square that’s crisp on the edges, soft and chewy in the middle, with a swirl of creamy tiramisu that melts on your tongue. The best part? You don’t need any fancy equipment, just a few pantry staples and a love for indulgent desserts. Ready to dive in? Let’s get started, and I promise you’ll finish this article with a smile and a craving you won’t be able to ignore.
🌟 Why This Recipe Works
- Flavor Depth: The combination of espresso and cocoa creates a layered taste that mimics the classic tiramisu’s coffee punch while retaining the rich chocolate base of a brownie. Each bite delivers a harmonious blend that feels both familiar and exciting.
- Texture Contrast: The fudgy brownie interior meets the light, airy mascarpone swirl, giving you a delightful contrast between dense chocolate and silky cream that keeps the palate engaged.
- Ease of Execution: Despite its gourmet vibe, the recipe uses straightforward techniques—no special molds, no tempering chocolate—making it approachable for home cooks of any skill level.
- Time Efficiency: With a total time of just 45 minutes, you can whip up a show‑stopping dessert even on a weeknight, leaving plenty of time for other festivities.
- Versatility: The base can be adapted with different liqueurs, nuts, or even fruit, allowing you to customize the brownies to match any occasion or personal preference.
- Ingredient Quality: By using real espresso and high‑quality mascarpone, you avoid the artificial flavors that plague many boxed mixes, ensuring a clean, authentic taste.
- Crowd‑Pleasing Factor: The familiar flavors of chocolate and coffee make it a safe bet for most guests, while the elegant swirl adds a wow factor that feels restaurant‑grade.
- Balanced Nutrition: While undeniably indulgent, the recipe includes protein‑rich mascarpone and eggs, giving a modest nutritional boost compared to pure sugar‑laden treats.
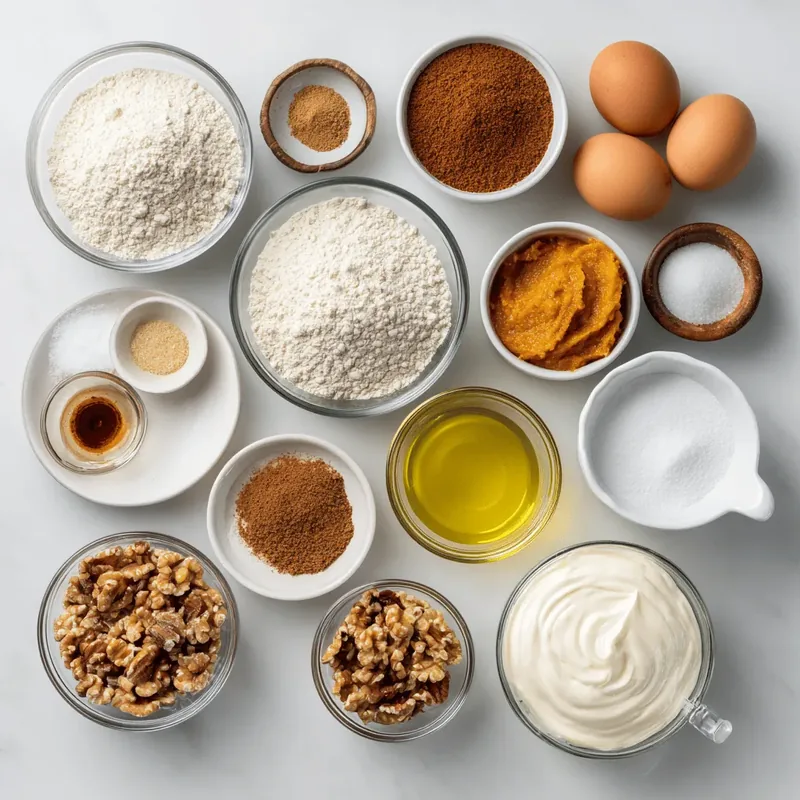
🥗 Ingredients Breakdown
The Foundation
The backbone of any brownie is the butter, sugar, and flour trio. Unsalted butter (1/2 cup, melted) brings a glossy sheen and a tender crumb, while keeping the flavor pure so it doesn’t compete with the espresso. Choose a butter that’s fresh and has a slightly creamy aroma—avoid the ultra‑low‑fat versions, which can make the batter gritty. Granulated sugar (1 cup) not only sweetens but also contributes to the chewy texture; using fine, white sugar ensures it dissolves quickly, preventing a grainy mouthfeel. Finally, all‑purpose flour (1/2 cup) provides structure without making the brownies cakey; the modest amount keeps them dense and fudgy.
Aromatics & Spices
Unsweetened cocoa powder (1/3 cup) is the heart of the chocolate flavor. Opt for a Dutch‑process cocoa for a smoother, less acidic taste, or stick with natural cocoa if you prefer a brighter, more bitter edge that pairs beautifully with coffee. Salt (1/4 tsp) might seem trivial, but it amplifies the chocolate’s depth and balances the sweetness, creating a more rounded flavor profile. And then there’s the star of the show: strong brewed espresso (1/2 cup, cooled). Using freshly brewed espresso—preferably from a high‑quality bean—injects a bold, aromatic coffee note that’s essential for that tiramisu vibe.
The Secret Weapons
Mascarpone cheese (8 oz, softened) is what transforms a regular brownie into a tiramisu masterpiece. Its buttery, slightly tangy character adds a luxurious creaminess that mirrors the classic Italian dessert. If you can’t find mascarpone, a blend of cream cheese and a splash of heavy cream works in a pinch, though the texture will be slightly less silk‑smooth. Powdered sugar (1/4 cup) sweetens the mascarpone without making it gritty, ensuring a velvety swirl. For an adult twist, coffee liqueur (1 tbsp, optional) deepens the coffee flavor and adds a subtle warmth—just a splash, and you’ll hear a collective “Mmm!” from your guests.
Finishing Touches
Semi‑sweet chocolate chips (1/2 cup) melt into pockets of melty goodness that pop through the brownie surface, providing bursts of pure chocolate joy. Finally, a generous dusting of cocoa powder before serving adds a visual elegance and a final aromatic note that ties the whole experience together. When selecting cocoa for dusting, use a fine sifted powder to avoid clumps and ensure an even, professional‑looking finish.
With your ingredients prepped and ready, let's get cooking. Here’s where the fun really begins…

🍳 Step-by-Step Instructions
- Preheat your oven to 350°F (175°C) and line a 9‑inch square baking pan with parchment paper, allowing the paper to hang over the sides for easy removal. While the oven warms, melt the butter in a medium saucepan over low heat, watching it turn a golden liquid without bubbling. Once melted, remove from heat and let it cool just enough so it doesn’t scramble the eggs later. The kitchen will start to fill with a buttery aroma that hints at the richness to come. 💡 Pro Tip: If you’re using a glass pan, lower the oven temperature by 25°F to prevent over‑browning.
- In a large mixing bowl, whisk together the granulated sugar and eggs until the mixture becomes pale, thick, and ribbons form when you lift the whisk—this usually takes about 2‑3 minutes. Add the vanilla extract and continue whisking for another 30 seconds, letting the fragrance of vanilla mingle with the sweet egg mixture. This step creates a light, airy base that will keep the brownies from becoming too dense. ⚠️ Common Mistake: Over‑mixing at this stage can incorporate too much air, leading to a cake‑like texture rather than fudgy.
- Slowly pour the melted butter into the egg‑sugar mixture while gently folding with a rubber spatula. The batter should come together in a glossy, slightly thick ribbon. At this point, stir in the cocoa powder, flour, and salt, folding just until you see no streaks of flour. Over‑mixing the flour can develop gluten, which would make the brownies tough, so be gentle. The batter will look dark, luscious, and ready for the coffee infusion.
- In a separate small bowl, whisk together the cooled espresso, coffee liqueur (if using), and powdered sugar until the sugar dissolves completely. This espresso‑sugar mixture should be smooth and slightly thick, resembling a concentrated coffee syrup. Pour half of this espresso blend into the brownie batter, reserving the other half for the mascarpone swirl later. The batter will now have a deep, mocha hue that’s almost intoxicating.
- In another bowl, combine the softened mascarpone with the remaining espresso‑sugar mixture, folding until the mixture is silky and free of lumps. This creates the tiramisu swirl that will later melt into the brownies as they bake. If you want extra decadence, fold in the chocolate chips at this stage, allowing them to distribute evenly throughout the swirl.
- Pour the brownie batter into the prepared pan, spreading it evenly with a spatula. Then, dollop spoonfuls of the mascarpone‑espresso mixture on top of the batter. Using a knife or a skewer, gently swirl the two batters together, creating marbled ribbons that peek through the surface. The visual of the dark chocolate and creamy coffee swirl is what makes this dessert a show‑stopper.
- Slide the pan into the preheated oven and bake for 25‑30 minutes, or until the edges are set and a toothpick inserted into the center comes out with a few moist crumbs attached. You’ll notice the top turning a deep, inviting brown, and the aroma of chocolate and coffee will fill your kitchen, making it impossible to wait. Keep a close eye after the 25‑minute mark; overbaking can dry out the mascarpone swirl.
- Remove the brownies from the oven and let them cool in the pan for at least 15 minutes. While still warm, dust a generous layer of cocoa powder over the top for that classic tiramisu finish. After cooling, use the parchment overhang to lift the brownies out of the pan, then cut into squares. Go ahead, take a taste — you’ll know exactly when it’s right: the center should be fudgy, the swirl creamy, and the coffee flavor lingering just enough to keep you reaching for another piece.
And there you have it! But before you dig in, let me share some tips that will take this from great to absolutely unforgettable…
🔐 Expert Tips for Perfect Results
The Taste Test Trick
Before you fold the mascarpone swirl into the batter, taste a tiny spoonful of the espresso‑sugar mixture. If it’s not bold enough, add a splash more espresso; if it’s too intense, balance it with a pinch of extra powdered sugar. This tiny adjustment ensures every bite hits the perfect coffee‑chocolate harmony. I once served a batch that was a shade too bitter, and my guests politely asked for a “sweet fix.” Adjusting the taste early saves you from that awkward moment.
Why Resting Time Matters More Than You Think
Allow the brownies to rest at room temperature for at least 30 minutes after they’ve cooled. This rest period lets the mascarpone settle and the flavors meld, creating a smoother texture. Skipping this step can result in a crumbly swirl that separates from the brownie base. Trust me, the extra half‑hour is worth the silky mouthfeel you’ll experience.
The Seasoning Secret Pros Won’t Tell You
A pinch of sea salt sprinkled on top just before baking can amplify the chocolate’s richness and bring out the espresso’s bright notes. Professional pastry chefs often use flaky sea salt for a subtle crunch that adds another layer of texture. I discovered this trick after a friend, a pastry chef, whispered it over a coffee break, and it transformed my brownies forever.
Choosing the Right Espresso
Don’t settle for instant coffee; a freshly brewed espresso from a quality bean will give you the depth and aroma you need. If you don’t have an espresso machine, a moka pot or a strong French press brew works beautifully. The key is to use a brew that’s strong enough to stand up to the chocolate without becoming watery.
The Cool‑Down Swirl
When the brownies are still warm, gently press a spatula over the surface to encourage the swirl to spread slightly. This creates a more pronounced marbled effect that’s both visually stunning and ensures every bite contains both flavors. I once tried this on a cold brownie and the swirl stayed stubbornly in clumps—warmness truly makes a difference.
🌈 Delicious Variations to Try
One of my favorite things about this recipe is how versatile it is. Here are some twists I’ve tried and loved:
Nutty Hazelnut Crunch
Replace half of the chocolate chips with toasted hazelnuts, and add a tablespoon of hazelnut liqueur to the espresso mixture. The nuts add a buttery crunch that complements the creamy swirl, while the liqueur deepens the nutty coffee flavor.
White Chocolate & Raspberry Swirl
Swap the semi‑sweet chocolate chips for white chocolate chips, and fold in a spoonful of raspberry puree into the mascarpone mixture. The tangy raspberry cuts through the richness, creating a bright contrast that’s perfect for spring gatherings.
Mocha Mint Delight
Add a teaspoon of peppermint extract to the mascarpone blend and sprinkle crushed mint chocolate pieces on top before baking. This gives a refreshing minty lift that pairs beautifully with the coffee‑chocolate base, making it a hit for holiday parties.
Spiced Chai Infusion
Infuse the espresso with a pinch of chai spices—cinnamon, cardamom, and ginger—by simmering them together for a minute before straining. The resulting warm spice notes add an exotic layer that feels cozy and comforting.
Vegan & Gluten‑Free Adaptation
Swap the butter for coconut oil, use a plant‑based sugar, and replace the all‑purpose flour with a blend of almond flour and oat flour. Use a dairy‑free mascarpone substitute made from cashews blended with lemon juice. This version keeps the indulgent texture while catering to dietary restrictions.
📦 Storage & Reheating Tips
Refrigerator Storage
Place the cooled brownies in an airtight container and store them in the fridge for up to 4 days. The cool environment keeps the mascarpone from separating and maintains the fudgy texture. If you notice a slight hardening of the swirl, let the brownies sit at room temperature for 10‑15 minutes before serving.
Freezing Instructions
For longer storage, wrap individual squares tightly in plastic wrap, then place them in a freezer‑safe bag. They’ll keep for up to 2 months. When you’re ready to enjoy them, thaw overnight in the fridge and then bring to room temperature for the best texture.
Reheating Methods
To reheat without drying out, place a brownie on a microwave‑safe plate, sprinkle a few drops of water around the edges, and microwave for 15‑20 seconds. Alternatively, warm them in a preheated 300°F oven for 5‑7 minutes, covering loosely with foil to retain moisture. The trick to reheating without drying it out? A splash of espresso or milk added just before heating keeps the center luscious.