Imagine a dip that captures the bold spirit of a Tex‑Mex fiesta while staying perfectly portable for parties, game nights, or a casual snack. The Ultimate Tex‑Mex Fiesta Dip: A Flavorful Journey delivers that excitement in a single bowl, layering creamy cheese, smoky beans, and a punch of fresh salsa.
What makes this dip truly special is the harmony between its textures—crunchy tortilla chips, velvety cheese, and hearty beans—paired with a secret blend of spices that sing with every bite. A drizzle of lime‑infused crema ties everything together, creating a flavor profile that’s both familiar and adventurous.
This crowd‑pleaser is perfect for anyone who loves bold, comforting flavors: from kids who adore cheesy goodness to adults seeking a sophisticated snack with a kick. Serve it at tailgate parties, movie marathons, or as a vibrant starter before dinner.
The preparation is straightforward: layer, bake, and garnish. First you’ll sauté aromatics, then blend the cheese and beans, bake until bubbly, and finish with fresh cilantro and a squeeze of lime. In under an hour you’ll have a dip that looks as festive as it tastes.
Why You'll Love This Recipe
Layered Flavor Explosion: Each spoonful delivers a different bite—creamy cheese, smoky beans, tangy salsa, and a hint of lime—keeping the palate excited from start to finish.
Effortless Assembly: With just a few steps—mix, layer, bake—you’ll have a restaurant‑quality dip without the need for specialized equipment or advanced techniques.
Versatile Crowd‑Pleaser: Whether it’s a family gathering, a sports watch party, or a potluck, this dip fits every occasion and satisfies both mild and adventurous taste buds.
Make‑Ahead Friendly: The dip can be assembled ahead of time and baked just before serving, giving you more freedom to enjoy the party instead of being stuck in the kitchen.
Ingredients
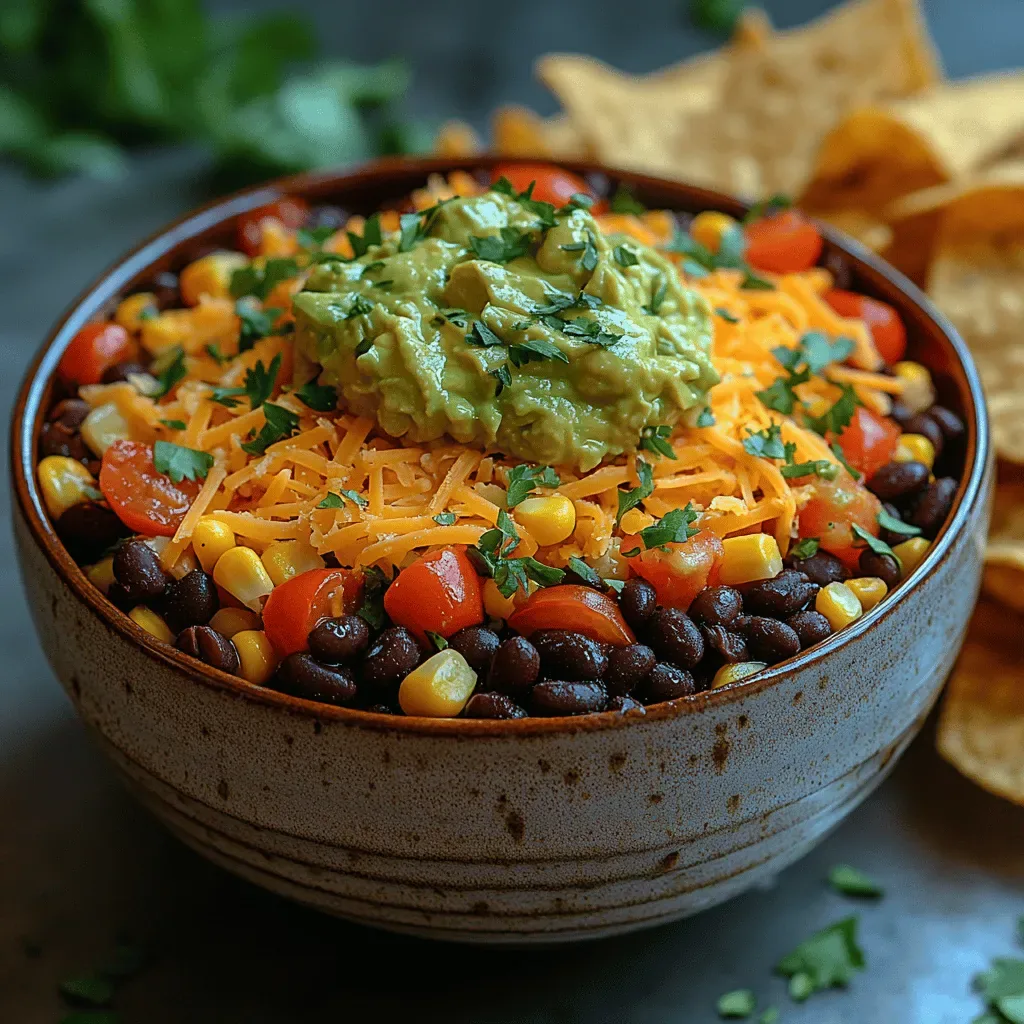
To capture the true essence of Tex‑Mex, this dip relies on a balance of fresh and pantry staples. The base of black beans and corn provides heartiness, while a blend of cheeses creates a melt‑in‑your‑mouth richness. Bright salsa, jalapeños, and lime add acidity and heat, and the final garnish of cilantro and avocado supplies a fresh, buttery finish. Together these ingredients build layers of flavor that make each bite unforgettable.
Main Ingredients
- 1 (15‑oz) can black beans, drained and rinsed
- 1 cup frozen corn kernels, thawed
- 1 cup salsa verde (mild to medium)
- 1 cup shredded sharp cheddar cheese
- 1 cup shredded Monterey Jack cheese
Sauce & Creamy Elements
- ½ cup sour cream
- ¼ cup mayonnaise
- 2 tablespoons fresh lime juice
Seasonings & Heat
- 1 teaspoon ground cumin
- ½ teaspoon smoked paprika
- ¼ teaspoon cayenne pepper (optional)
- Salt and freshly ground black pepper to taste
Garnish
- ½ cup diced avocado
- ¼ cup chopped fresh cilantro
- 1 jalapeño, thinly sliced (optional)
- Fresh lime wedges for serving
These ingredients work together to create a dip that’s both hearty and bright. The beans and corn give a satisfying bite, while the dual‑cheese blend melts into a smooth, gooey layer. The lime‑infused crema adds tang, balancing the richness, and the cumin‑smoked paprika combo provides depth without overwhelming heat. Finishing with avocado, cilantro, and jalapeño adds freshness and a pop of color that makes the dip as visually appealing as it is tasty.
Step-by-Step Instructions
Preparing the Base
Start by preheating your oven to 375°F (190°C). While the oven warms, combine the drained black beans, corn, and salsa verde in a large mixing bowl. Stir in the cumin, smoked paprika, cayenne (if using), and a pinch of salt and pepper. This mixture forms the flavorful foundation that will bake into a cohesive dip.
Creating the Creamy Cheese Layer
In a separate bowl, whisk together sour cream, mayonnaise, and fresh lime juice until smooth. Fold in the shredded cheddar and Monterey Jack cheeses, ensuring an even distribution. The acidity from the lime cuts through the richness of the dairy, while the cheese melt provides that classic dip stretch.
Assembling the Dip
- Layer the bean mixture. Spread the seasoned bean‑corn blend evenly across the bottom of a 9‑inch (23 cm) baking dish. This creates a sturdy base that will hold the cheese layer without sinking.
- Spread the creamy cheese. Spoon the sour‑cream cheese mixture over the beans, using a spatula to smooth the top. Aim for an even thickness so the dip bakes uniformly.
- Add optional heat. If you love extra spice, sprinkle the sliced jalapeño evenly across the cheese layer now. The heat will infuse during baking, delivering a gentle kick.
- Bake to bubbly perfection. Place the dish in the preheated oven and bake for 18‑20 minutes, or until the cheese is melted, golden around the edges, and the dip is bubbling in the center. A visual cue is the cheese turning a light amber hue.
- Finish with fresh garnishes. Remove the dip from the oven and let it rest for 5 minutes. Scatter diced avocado, chopped cilantro, and a few extra jalapeño slices on top. Finish with a final squeeze of lime juice for brightness.
Serving the Fiesta
Transfer the hot dip to a serving platter or keep it in the baking dish. Serve immediately with sturdy tortilla chips, crunchy pita wedges, or sliced veggies. The dip stays warm for about 30 minutes; if it begins to set, reheat briefly in a 300°F oven to restore its meltiness.
Tips & Tricks
Perfecting the Recipe
Dry Beans & Corn: Pat the beans and corn dry with a paper towel before mixing. Excess moisture prevents the dip from setting properly and can make the cheese soggy.
Even Cheese Distribution: Toss the shredded cheeses with the sour‑cream mixture rather than sprinkling them on top. This ensures every bite has a creamy cheese component.
Room‑Temperature Ingredients: Let the dairy components sit out for 10‑15 minutes before mixing. Warm ingredients blend more smoothly and reduce clumps.
Flavor Enhancements
Add a tablespoon of chipotle in adobo for smoky heat, or stir in a handful of chopped roasted red peppers for extra sweetness. A drizzle of extra‑virgin olive oil just before serving adds a silky finish that elevates the dip.
Common Mistakes to Avoid
Avoid over‑baking; once the cheese turns golden, the dip is done. Overcooking dries out the beans and makes the dip crumbly. Also, don’t skip the resting time—cutting too early releases steam and moisture, leaving the dip watery.
Pro Tips
Use a Cast‑Iron Skillet for Browning: If you’d like a lightly toasted bottom, pre‑heat a cast‑iron skillet, add a thin layer of oil, and sear the bean‑corn mixture for 2 minutes before transferring to the baking dish.
Finish with a Sprinkle of Cotija: Crumbled Cotija cheese added after baking gives a salty, tangy contrast that mimics authentic Mexican street food.
Serve Warm, Not Hot: Let the dip sit for a couple of minutes after baking; this temperature is ideal for dipping without burning the tongue.
Variations
Ingredient Swaps
Replace black beans with pinto or refried beans for a smoother texture. Swap Monterey Jack for pepper jack if you enjoy extra heat. For a smoky twist, stir in ½ cup roasted fire‑roasted tomatoes or use chipotle‑flavored salsa instead of regular salsa verde.
Dietary Adjustments
Make it dairy‑free by using vegan cream cheese and shredded plant‑based cheese. For a gluten‑free version, ensure the salsa and any added chips are certified gluten‑free. To lower the carb count, replace the tortilla chips with sliced cucumber or jicama sticks.
Serving Suggestions
Pair the dip with crunchy tortilla chips, toasted pita wedges, or even warm naan for a fusion twist. For a lighter bite, serve alongside a crisp mixed greens salad tossed in lime vinaigrette. It also works beautifully as a topping for baked sweet potatoes or as a hearty layer in a taco bar.
Storage Info
Leftover Storage
Allow the dip to cool to room temperature, then transfer it to an airtight container. Store in the refrigerator for up to 4 days. For longer preservation, portion into freezer‑safe bags, squeeze out excess air, and freeze for up to 3 months. Thaw overnight in the fridge before reheating.
Reheating Instructions
Reheat gently in a 350°F oven, covered with foil, for 15‑20 minutes until warmed through. Stir halfway to redistribute the sauce. If using a microwave, heat in 30‑second bursts, stirring between intervals, and add a splash of milk or broth to restore creaminess.
Frequently Asked Questions
This Ultimate Tex‑Mex Fiesta Dip brings together bold flavors, creamy textures, and a festive presentation in a single, easy‑to‑make dish. You now have every detail—from ingredient choices to storage tips—so you can recreate it confidently and adapt it to your own palate. Feel free to experiment with heat levels, cheese blends, or garnish variations; the best part of cooking is making it truly yours. Gather your favorite chips, dig in, and enjoy the fiesta in every bite!